Quantcast
Channel: Randy Riness @ SPSCC aggregator
Viewing all 3015 articles
Browse latest View live

MSDN Blogs: IIS with URL Rewrite as a reverse proxy – part 3 – rewriting the outbound response contents

$
0
0

This is the third part of the article series dealing with IIS using URL rewrite as a reverse proxy for real world apps. Check out part 1 and part 2 before reading on.

Configuring outbound rules for Javascript encoded content.

More and more applications send content to the browser in the form of Javascript encoded content, which the javascript running in the page that has requested the content then integrates into the DOM (Document Object Model) of the page. This content might include such things as Anchor <a> tags, or form tags which have action attributes. Below are examples of such snippets of code:

<a href=”http://privateserver:8080/coding_rules/#rule_key=OneVal%3APPErrorDirectiveReached” target=”_blank”>
<form method=”post” class=”rule-remediation-form-update” action=”http://privateserver:8080/admin_rules_remediation/update”>

Note the (inverted slash) before each of the values of the href and action attributes.

If we look at the ‘ReverseProxyOutboundRule1’ in the rules section of URL Rewrite, rule which was created in the Reverse Proxy wizard we ran in part 1 of this blog series and we check the Preconditions associated with this rule, we will see that a precondition was created during the Reverse Proxy setup wizard, the precondition is called ResponseIsHtml1.

If you click on the ‘Edit’ button next to the ResoponseIsHtml1 precondition, we can see the configuration of the precondition. This precondition matches any responses coming from the back end server that have the response content type set to text/html.

Since Javascript encoded content is text/application-javascript, the easiest way to work around this limitation is to change the precondition to match responses with the content type of type text/* – text followed by slash anything. To do this, click on the {Response_Content_Type} in the list and then click the ‘Edit’ button next to this. This will allow you to edit the regular expression that is used to inspect the content type of responses coming from the backend server.

Change the pattern of the regular expression to ‘^text/(.+)‘ – meaning that the content type should start with text/ followed by any character, but at least one character. Click the ‘Ok’ button to save these changes.

Site Node: you could also create a second precondition called ResponseIsTextStar and set the new regular expression in this precondition as we will be creating more outbound rules. In this way you can have a rule for only HTML content and a rules for the rest.

Now we will need to create two new outbound rules to address the case of the <a> anchor tags and the action attributes of the form tags which are encoded. Because they are encoded we cannot use the built in tag scanning that URL Rewrite provides for us in outbound rules. We will have to write a regular expression to match these two tags in all content.

Let’s start with the anchor <a> tags. Create a new blank outbound rule from the Rule Wizard, and then configure it to use the precondition we created / modified earlier. In the Match pane configure the rule as shown below:

Set the ‘Matching Scope’ to ‘Response’ in the dropdown, make sure that all the items within the ‘Match Content Within’ dropdown are deselected – this will mean URL Rewrite will scan the entire response not just specific tags. Select ‘Matches the Pattern’ in the ‘Content’ dropdown and ‘Regular Expressions’ in the ‘Using’ dropdown. Use the following pattern in the Pattern textbox: ‘href=(.*?)http://privateserver:8080/(.*?)s‘ – you should replace privateserver:8080 with the url of your backend server.

Moving down to the Actions pane, configure the following:

Set the ‘Action’ dropdown to ‘Rewrite’ and then use the following pattern: ‘href={R:1}https://www.mypublicserver.com/{R:2}‘ in the Pattern textbox. Replace the https://www.mypublicserver.com/ with the URL of your server. Finally press the ‘Apply’ action link on the right hand pane to create the new rule.

We will need to add a second outbound rule to deal with the form element’s encoded action attributes. To do this, we will create a second blank outbound rule. The configuration of the rule is the same as above in the Match pane, except for the regular expression to be used, which changes to: ‘action=(.*?)http://privateserver:8080/(.*?)\‘ – again replace the http://privateserver:8080/ with the URL of the backend server.

The configuration is identical to the first rule in the Action pane as well. The pattern to be used here is the following: ‘action={R:1}https://www.mypublicserver.com/{R:2}‘ where you will need to replace https://www.mypublicserver.com/ with the IIS server URL accessible to your users. Once you have pressed the Apply action link on the right hand side pane, the rule is saved and the configuration is now applied.

In conclusion:

We now have an IIS web-server that uses URL Rewrite to act as a reverse proxy. The server can deal with the issue of compressed responses coming out of the backend web-application by disabling the accept-encoding header, and is able to modify content coming back from the backend web-application even if this content is javascript encoded and contains anchor tags or action attributes on form elements.

By Paul Cociuba
http://linqto.me/about/pcociuba


MSDN Blogs: Visual Studio “15” Preview 4 釋出囉!

$
0
0

今天我們發佈了 Visual Studio “15” Preview 4,引進了很多新的改善與修復依些錯誤,讓我們朝產品的完整性又邁進了一步。

這次發佈的重點是幾乎所有的 VS 都會在新的安裝程式引擎上運行,讓安裝變得輕巧又快速些,並有較小的影響。最小的安裝大小少於 500 MB(比起先前的版本的 6GB)。還有一些「工作負載」還沒出現,包含 .NET Core 工具與 Azure 工具,但其他原有的 VS 2015 功能集是可以使用的。

New-Visual-Studio-Installer

更多有關新安裝程式的背景,之前兩篇文章程式與讓我們了負載。期待看到更多改進在我們釋出之前,包含支援自動部署、離線安裝與進一步的重構和組件化。

除了新的安裝程式之外,Preview 4 也包含了很多其他的改進。我們對最常用的Recent 清單與 News 摘要新增新的開始與建立的功能修補了起始頁面的體驗。而 C++ 也有了很大的改善在整個面板上。我們同時也在進行回饋系統的升級,試試 IDE 中回報問題的功能來看看我們做了什麼,並看看 developer community portal的介面。

要瞭解這次版本的完整內容與一些已知的問題,可以看一下 Visual Studio “15” Preview 4 Release Notes

一些有關 Preview 4 重要的警告。第一,這是一個尚未支援的 preview,所以不要安裝它在您重要生產工作的機器上。第二,Preview 4 應該要與 Visual Studio 之前的版本並行,但您需要移除任何之前的 Visual Studio “15” Preview 的安裝,在開始新的安裝之前。如果有其他問題可以看看 Preview 4 FAQ

就如以往,我們歡迎您給予我們回饋。有什麼問題透過回報問題的選項來讓我們知道,不管是安裝程式的問題還是 Visual Studio IDE 本身。有什麼建議也可以透過 UserVoice讓我們知道,感謝您!


本文翻譯自 Visual Studio “15” Preview 4


VS

若對以上技術及產品有任何問題,很樂意為您服務! 請洽:台灣微軟開發工具服務窗口 – MSDNTW@microsoft.com / 02-3725-3888 #4922

MSDN Blogs: wertesttw

MSDN Blogs: HDInsight:- Attach additional Azure storage accounts to the cluster

$
0
0

HDInsight supports a notion of the default file system. The default file system implies a default scheme and authority. It can also be used to resolve relative paths. During the HDInsight creation process, an Azure Storage account and a specific Azure Blob storage container from that account is designated as the default file system.

In addition to this storage account, you can add additional storage accounts from the same Azure subscription or different Azure subscriptions during the creation process or after a cluster has been provisioned

Attach additional accounts during cluster provisioning

This bit is easy, while creating the HDInsight cluster go to optional configuration and add additional storage accounts

storage


Attach additional account to existing cluster

Storage accounts to the existing clusters can be added via Ambari by following below steps

Step 1:
Go to Ambari dashboard https://.azurehdinsight.net/

Step 2:
Navigate to HDFS –>Config –>Advanced, scroll down to Custom core-site
Capture1

.                         select

Step 3:-
Select Add Property and enter your storage account name and key in following manner

Key: fs.azure.account.key..blob.core.windows.net
Value: yourkey

Addkey

Step 4: Restart services from Ambari

Restartservices

Step 5: Test if you are able to access the data


xxxyy@hn0-clustername:~$ hadoop fs -ls wasbs://containername@ashishhbasestorageadl.blob.core.windows.net/folder

This is a cross post: originally posted at https://blogs.msdn.microsoft.com/ashish/2016/08/25/hdinsight-attach-additional-azure-storage-accounts/


MSDN Blogs: Enhance ARM deployments with PowerShell

$
0
0

Disclaimer: Cloud is very fast moving target. It means that by the time you’re reading this post everything described here could have been changed completely Smiley. Hopefully some things still apply to you! Enjoy the ride!


Azure Resource Manager templates (ARM) is excellent way to deploy your infrastructure to Azure (see example from my previous blog post to get started). However sometimes it might feel a bit of static when you need to build infrastructure that uses some shared elements or something that needs to be injected at runtime to the deployment.

But no worries PowerShell comes to the rescue! And by that I mean that we need to leverage scripting capabilities of PowerShell in our deployment pipeline. We’re not going to be in using pure static ARM templates and we’re not going to be using pure PowerShell either in our deployment but instead we want to pick best of both worlds. This lets us to get dynamic scripting characteristics to our deployment.

One very common scenario which people first bump into is the use of Key Vault in deployments. You of course want to securely manage your app secrets (source control is big no-no Smiley) but it’s a bit of challenge to manage it. If you look at the Quick start ARM templates on GitHub or documentation about Key Vault (example one) you get instructed to use Key Vault as static reference which will not work in practice when you need to work with real multi-environment systems. Those static references of course work when you have single simple environment but when you want to deploy this to n environments then it’s not going to scale. And this is the part where I’ll use PowerShell magic to make it multi-environment friendly.

So let’s use exactly same deployment method as I had in my previous blog post. First I have some source assets:
Source assets of our solution
Second I have CI:
CI
Third I have CD:
CD Overview
Now this is the part where we must pay a bit more attention. Change to the previous post is that now my process has two scripts:

deploy-initial.ps1: This is responsible of creating resource group and Key Vault if it doesn’t exist.
deploy.ps1: This is responsible of creating resources to the existing resource group and leveraging existing information from Key Vault.

Idea behind above split is to make sure that we create Key Vault resource first and dependent resources afterwards. And when the Key Vault is created it is also initialized with required contents. After that initial creation Key Vault secrets are managed directly to Key Vault (in another words outside from this script). This model also allows you to create the Key Vault beforehand in you want to. It would mean that deploy-initial.ps1 wouldn’t actually do anything since resources have been already earlier created.

Of course we need to pass the initial password to the release task and for that we can use release variables:
CD Variables

deploy-initial.ps1 uses following parameters:

NameExample values
-ResourceGroupNameyourservice-dev-rg
-VaultNameyourservice-dev-kv
-Location“North Europe”
-AdminPassword(ConvertTo-SecureString -String “$(AdminPassword)” -Force -AsPlainText)
-ServicePrincipal“abcdefgh-abcd-abcd-abcd-abcdabcdabcd”

Above values are just examples and for the -ServicePrincipal you need to have your real SPN guid. That can be retrieved with following query:

And why is that required then? Well even in the SPN creates the Key Vault it doesn’t have access rights to it for the required operations. Therefore, we need to explicitly grant access rights to the Key Vault to our SPN and for that you need to have identifier.

Entire beef of the deploy-initial.ps1 is this (full source is available at GitHub):

After deploy-initial.ps1 has done it’s magic we can move to next step which is deploy.ps1. Now this script can already rely that Key Vault is up and running and configured correctly. So now we can use Key Vault to retrieve secrets and pass them on directly to the deployment part as parameters:

It’s also very nice way to pass any other parameters to your deployment if you need to. Example different SKUs for different environment, different scaling per environment etc.
Maybe needless to say but passing parameters for ARM deployments gives you that required flexibility and dynamic behavior which you definitely want.

Bonus part

And since we have now Key Vault secrets available in our CD process we can do whatever we want with them. To give you wild and crazy demo I’ll just show that you can upload some custom bash script to the server and run it as part of your CD process (you could even generate that script in your deployment script Smiley). This highlighted text is coming from bash script output:
CD Custom bash script
Check out the source here.

Closing words

In this blog post I wanted to demonstrate PowerShell + ARM combination and the capabilities it provides. With this you should be able to enhance your deployment logic beyond the plain ARM capabilities.

You can find the source code used in this example application from GitHub at JanneMattila / 200-UbuntuDocker.

Anyways… Happy hacking!

MSDN Blogs: 주간닷넷 2016년 8월 16일

$
0
0

여러분들의 적극적인 참여를 기다리고 있습니다. 혼자 알고 있기에는 너무나 아까운 글, 소스 코드, 라이브러리를 발견하셨거나 혹은 직접 작성하셨다면 Gist주간닷넷페이지를 통해 알려주세요. .NET 관련 동호회 소식도 알려주시면 주간닷넷을 통해 많은 분과 공유하도록 하겠습니다.

금주의 커뮤니티 소식

Taeyo.NET에서 http://docs.ASP.NET의 ASP.NET Core 문서를 한글화하여 연재하고 있습니다.

Microsoft MVP인 박문찬님께서 C# UWP App 기초 개발 과정을 개설하셨습니다. 관심 있는 분들은 확인해 보셔도 좋을 것 같습니다.

On .NET 소식

지난 주 On .NET에서는 Pablo Santos 및 Francisco Monteverde와 함께 PlasticSCM에 대해 얘기를 나누어 보았습니다. PlasticSCM은 Semantic Merge와 같은 흥미로운 기능을 포함하는 형상 관리 (Version Control) 시스템입니다. 이미 유명한 형상 관리 시스템인 Git에 익숙하시고, Git만한 프로그램 없다고 생각하신다면, 이 비디오를 통해 깜짝 놀랄 준비 하시죠!

이번 주 On .NET에서는 Unity 3D의 Lucas Meijer와 함께 얘기를 나누어 보겠습니다.

금주의 패키지 – Orleans

Orleans은 복잡한 동시성 및 고가용성 패턴을 배우지 않아도 고가용 분산 애플리케이션(Distributed High-Scale Computing Applications)을 쉽게 구현할 수 있게 하는 프레임워크입니다. Microsoft Research에서 만들었으며 클라우드 환경에서 사용될 수 있도록 설계되었습니다.

Orleans는 Microsoft Azure로 제공되고 있으며, 주로 Microsoft 제품군에서 널리 사용됩니다. 특히 343 Industries가 개발한 액션 슈팅 게임 Halo 4와 Halo 5의 클라우드 서비스를 구축하는 데에도 널리 사용이 됐고, 여러 회사들도 Orleans를 채택하고 있습니다.

아래 예제는 Orleans가 사용자의 출입을 관리하는 예제 코드입니다.

아래 예제는 클라이언트를 구성할 때 사용할 수 있는 예제 코드입니다.

.NET 소식

ASP.NET 소식

Microsoft MVP인 박용준 강사님께서 ASP.NET Core 관련 동영상 강의를 공유해 주셨습니다.

F# 소식

Xamarin 소식

주간닷넷.NET Blog에서 매주 발행하는 The week in .NET을 번역하여 진행하고 있으며, 한글 번역 작업을 오픈에스지의 송기수 전무님의 도움을 받아 진행하고 있습니다.

song송 기수, 기술 전무, 오픈에스지
현재 개발 컨설팅회사인 OpenSG의 기술이사이며 여러 산업현장에서 프로젝트를 진행중이다. 입사 전에는 교육 강사로서 삼성 멀티캠퍼스 교육센터 등에서 개발자 .NET 과정을 진행해 왔으며 2005년부터 TechED Korea, DevDays, MSDN Seminar등 개발자 컨퍼런스의 스피커로도 활동하고있다. 최근에는 하루 업무의 대다수 시간을 비주얼 스튜디오와 같이 보내며 일 년에 한 권 정도 책을 쓰고, 한달에 두 번 정도 강의를 하면 행복해질 수 있다고 믿는 ‘Happy Developer’ 이다.

MSDN Blogs: How to register U-SQL Assemblies in your U-SQL Catalog

$
0
0

U-SQL’s extensibility model heavily depends on your ability to add your own custom code. Currently, U-SQL provides you with easy ways to add your own .Net-based code, in particular C#, but you can also add custom code written in other .Net languages, such as VB.Net or F#. You can even deploy your own runtime for other languages, although you will need to still provide the interoperability through a .Net layer yourself (I have a blog post on how to do this for another language like JavaScript in my backlog). If you want us to support a specific language, please file a feature request and/or leave a comment below.

In this blog post we will cover the following aspects:


What is the difference between Code behind and Assembly registration through ADL Tools in Visual Studio?

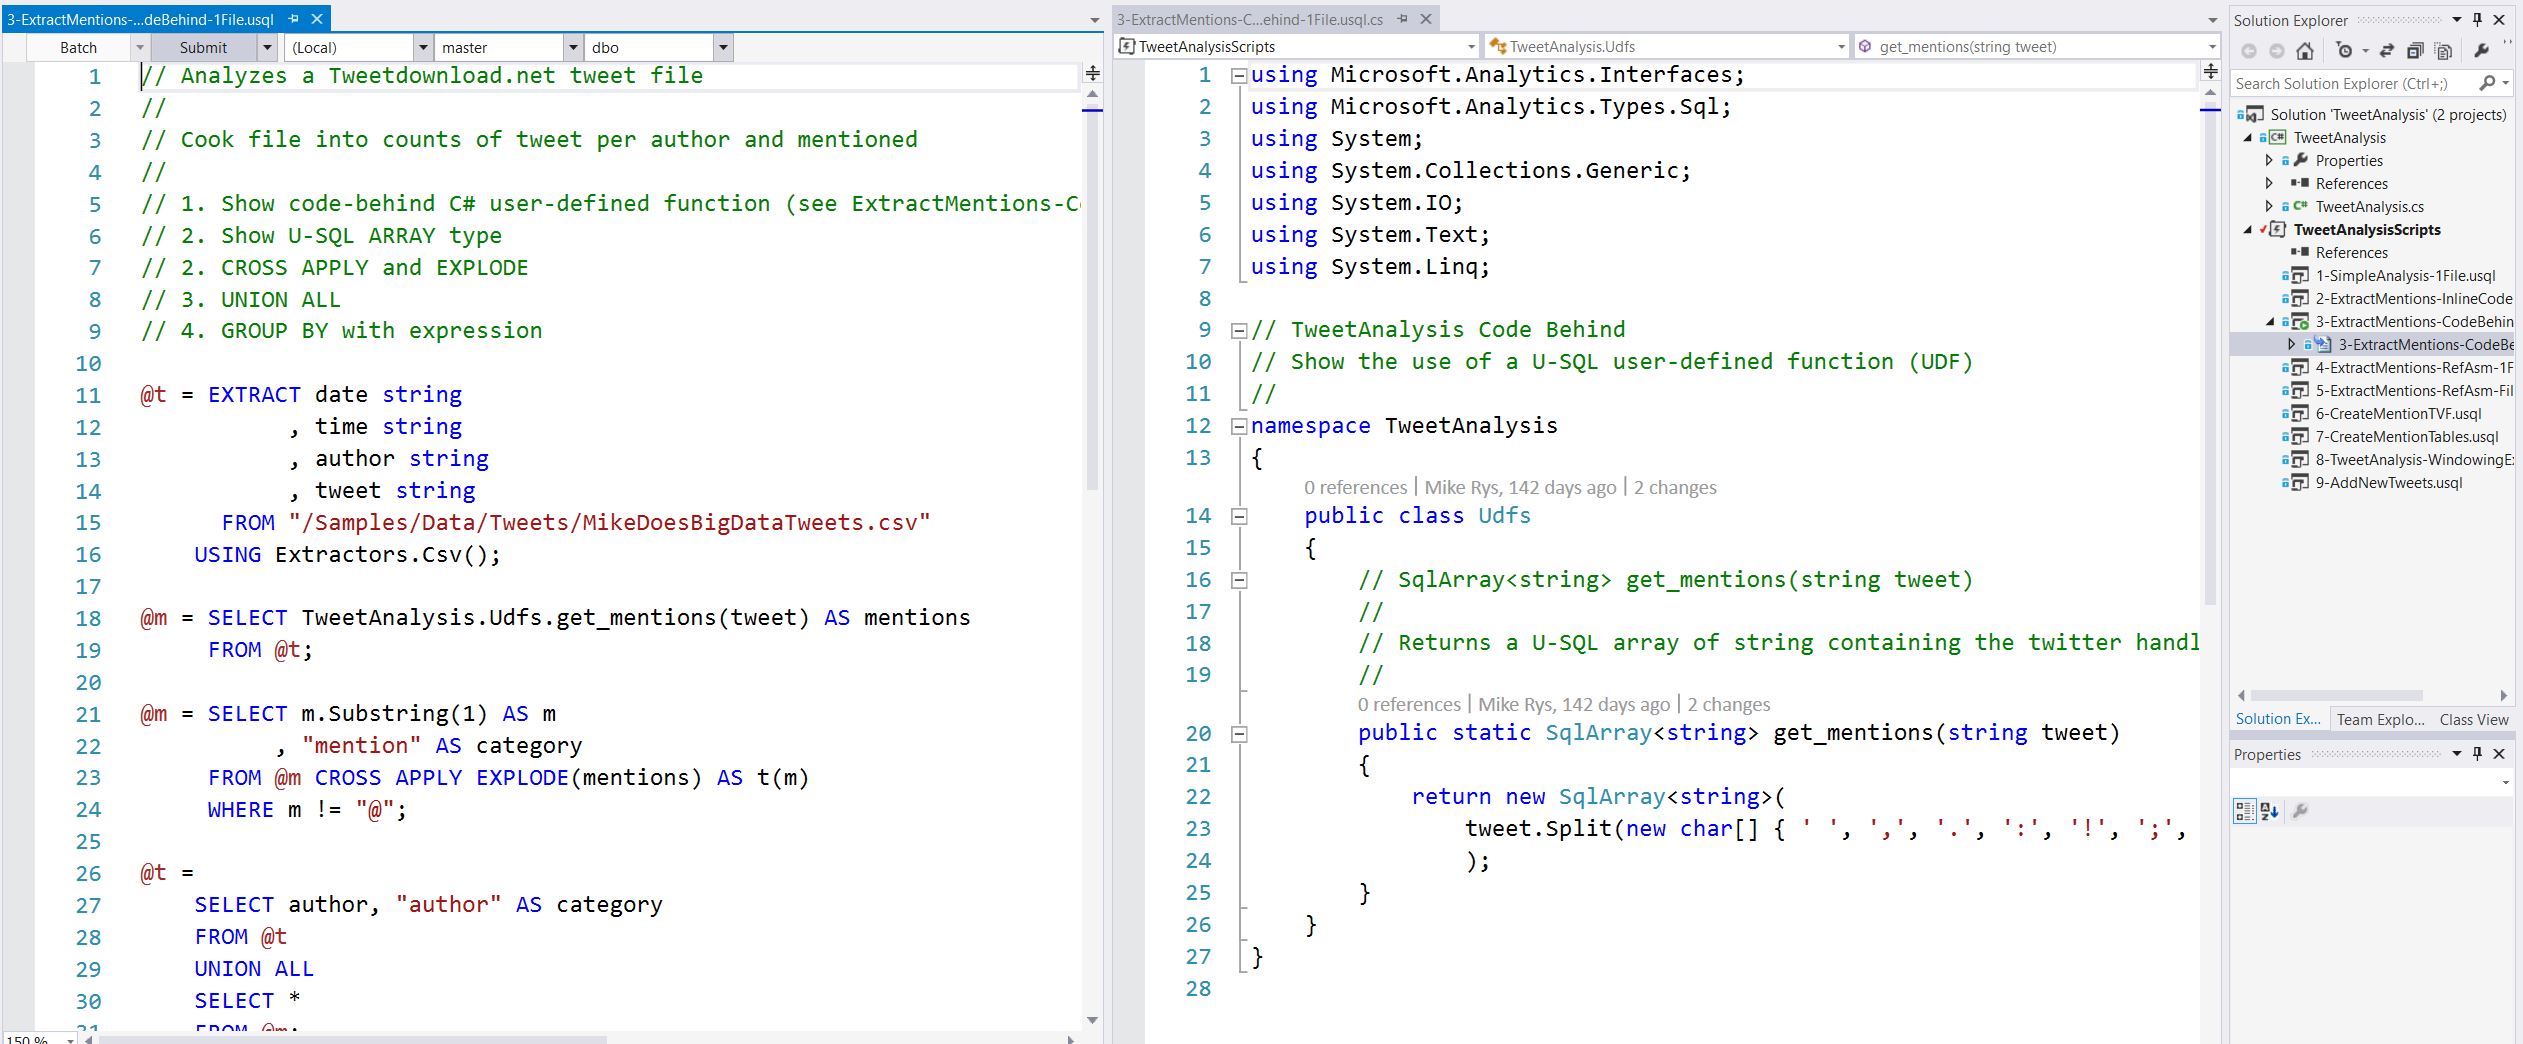
The easiest way to make use of custom code is to use the ADL Tools for VisualStudio’s code-behind capabilities.

You fill in the custom code for the script (e.g., Script.usql) into its code-behind file (e.g., Script.usql.cs). See Figure 1.

Code behind example in ADL Tools in VS
Figure 1: Code-behind example in ADL Tools in VS (click on image to enlarge, sample code is available here)

The advantage of code-behind is, that the tooling is taking care of the following steps for you when you submit your script:

  1. It builds the assembly for the code-behind file
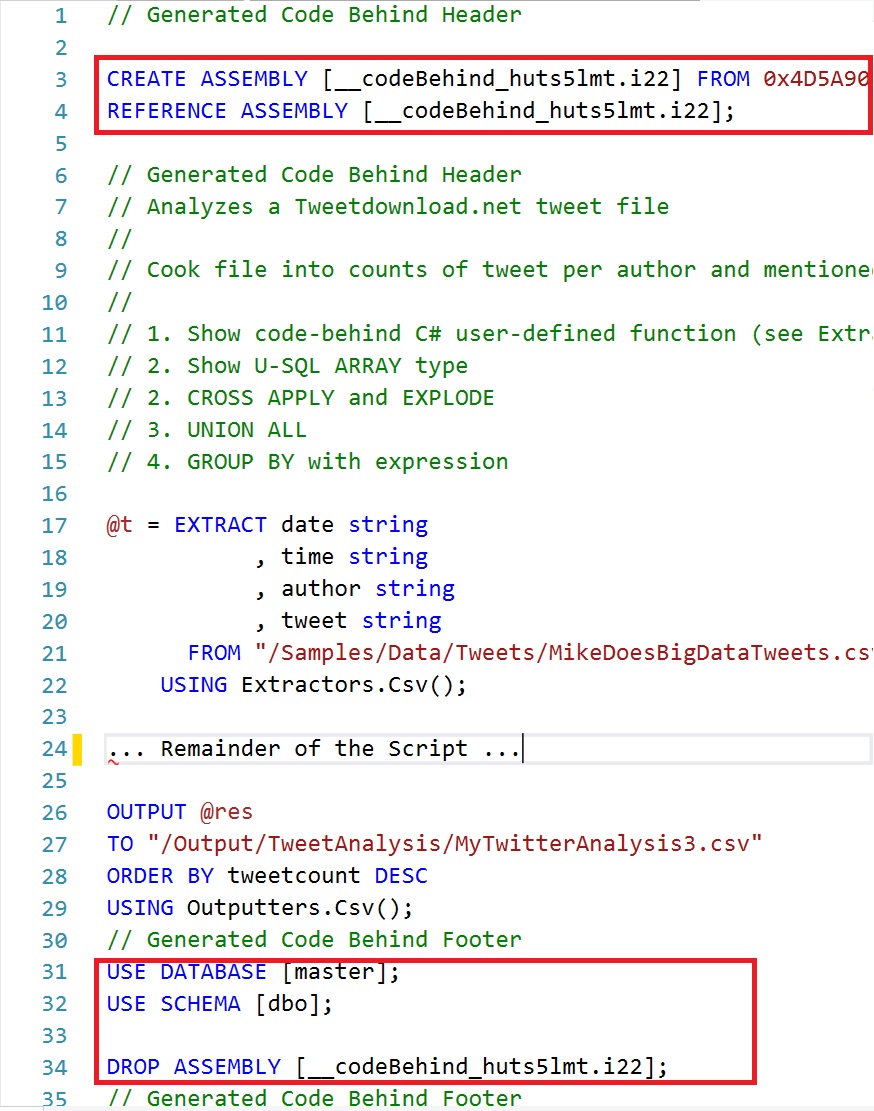
  2. It adds a prologue to the script that uses the CREATE ASSEMBLY statement to register the assembly file and uses REFERENCE ASSEMBLY to load the assembly into the script’s context.
  3. It adds an epilogue to the script that uses DROP ASSEMBLY to remove the temporarily registered assembly again.

You can see the generated prologue and epilogue when you open the script:

Auto-generated prologue and epilogue for code-behind
Figure 2: Auto-generated prologue and epilogue for code-behind

Some of the drawbacks of code-behind are

  • that the code gets uploaded for every script submission<
  • that the functionality cannot be shared with others.

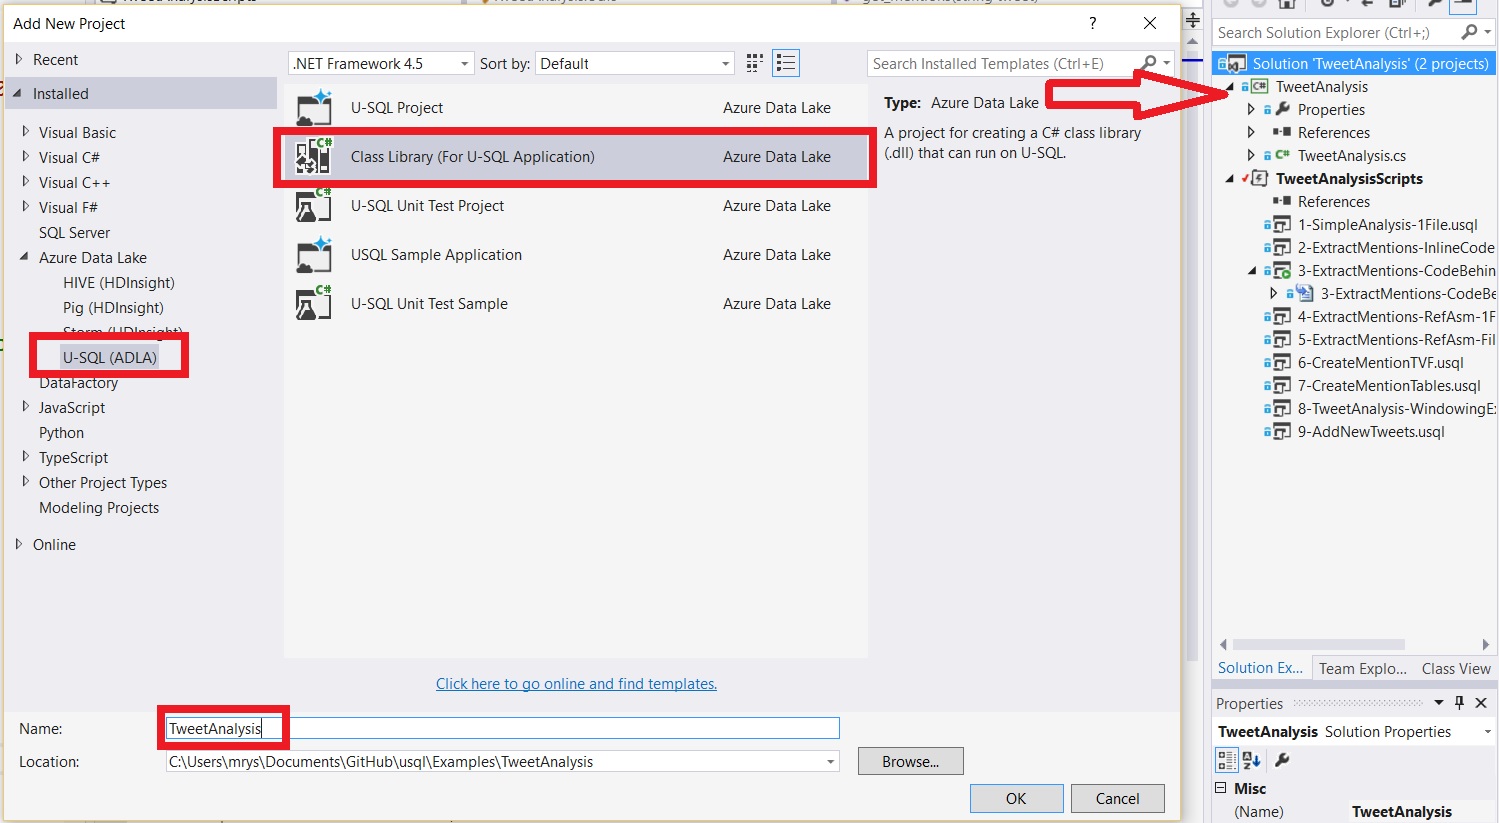
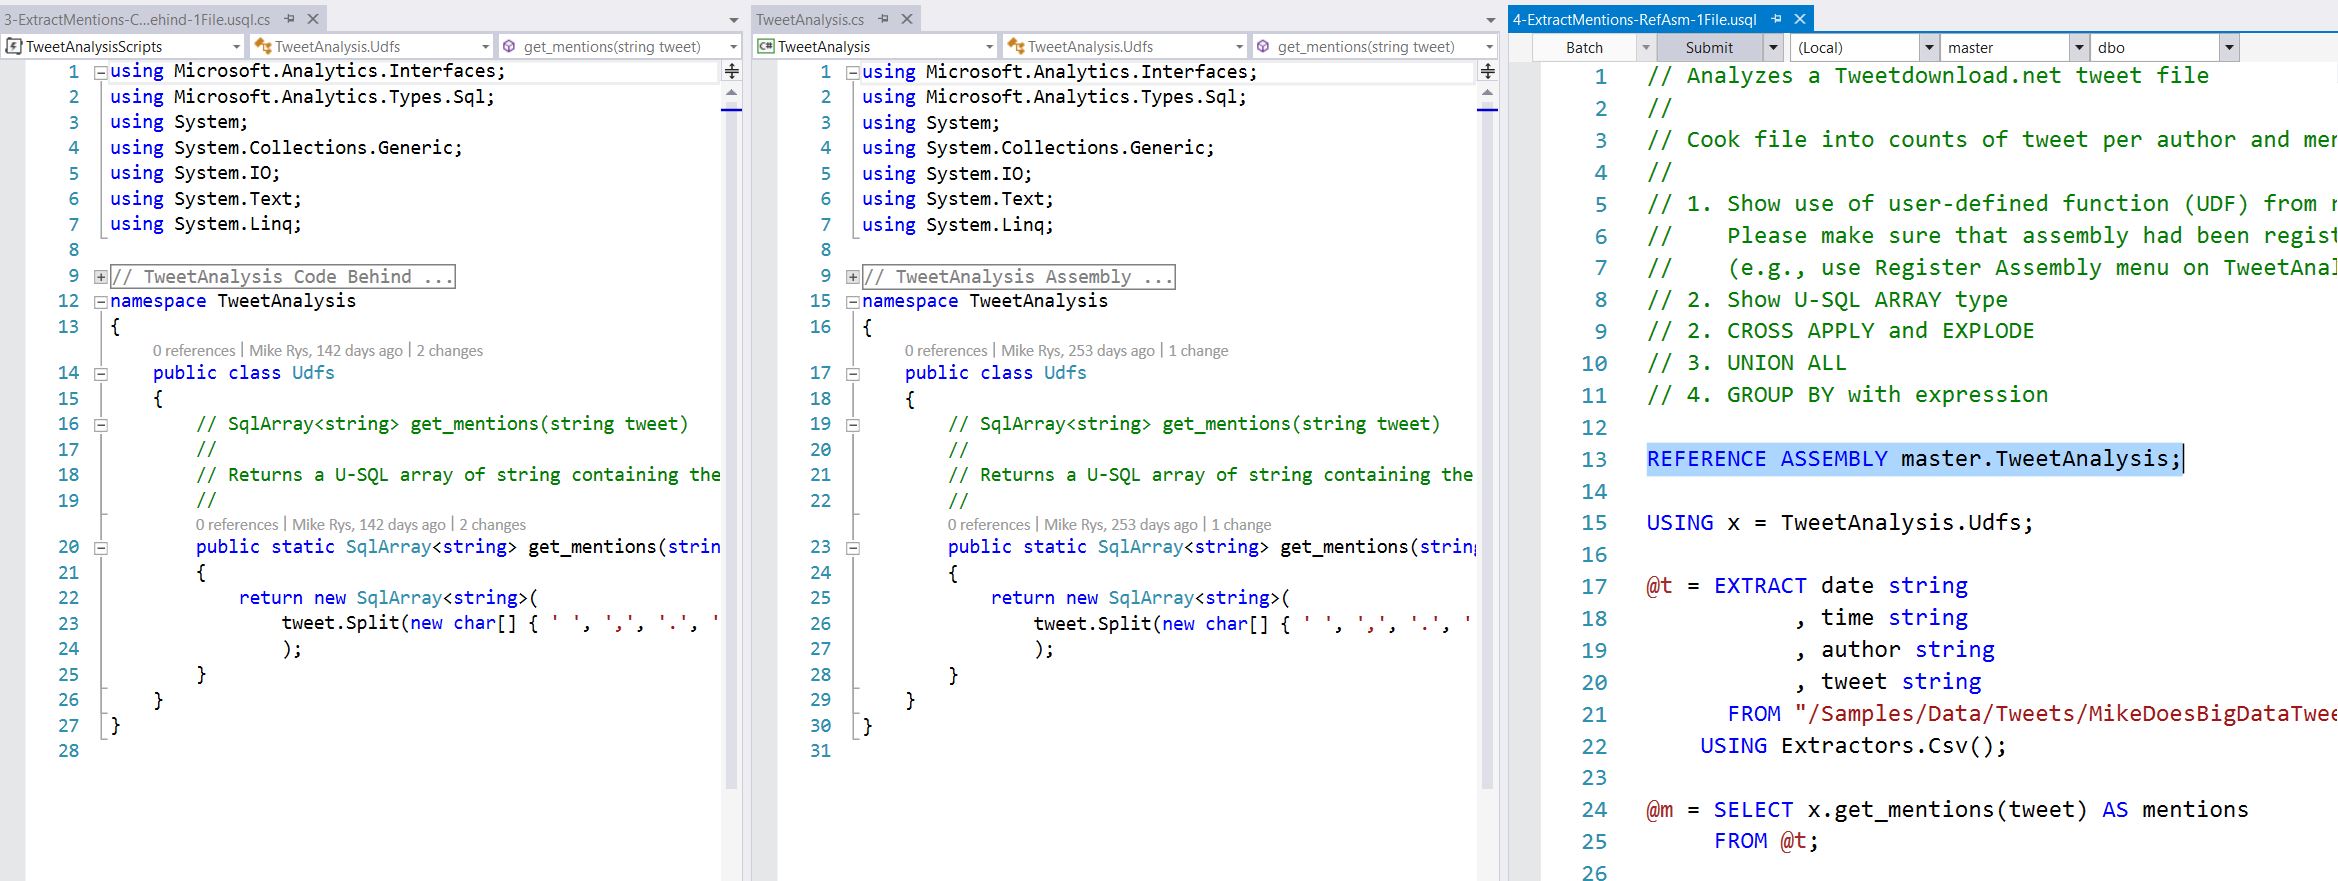
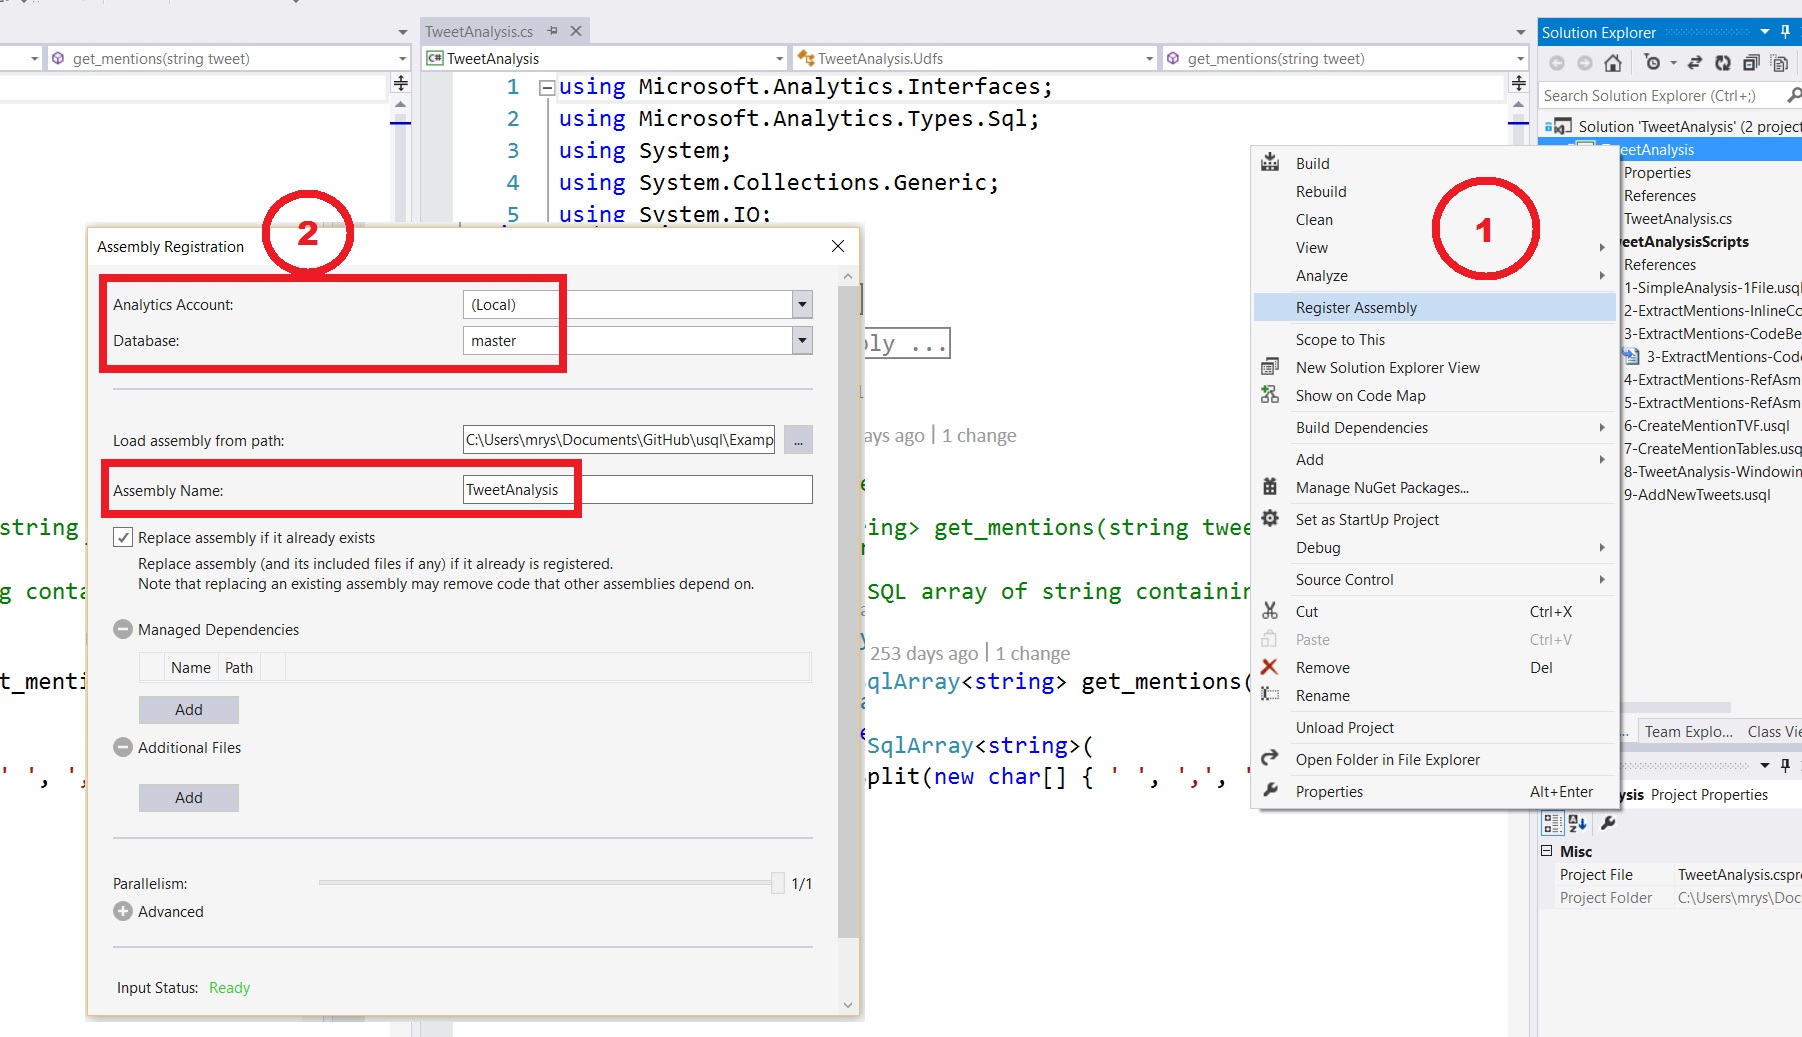
Thus, you can add a separate C# Class Library (for U-SQL) to your solution (see Figure 3), develop the code or copy existing code-behind code over (no changes in the C# code required, see Figure 4), and then use the Register Assembly menu option on the project to register the assembly (see Step 1 in Figure 5).

Creating a U-SQL C# code project
Figure 3: Creating a U-SQL C# code project.

The U-SQL C# class library next to the code-behind file
Figure 4: The U-SQL C# class library next to the code-behind file.

Register the U-SQL C# code project
Figure 5: How to register the U-SQL C# code project

The registration dialog box (see Step 2 in Figure 5) gives you the option on where to register the assembly (which Data Lake Analytics account, which database) and how to name it (the local assembly path gets filled in by the tool). It also provides an option to re-register an already registered assembly, and it provides two options to add additional dependencies:

  • Managed Dependencies: Shows the additionally needed managed assemblies. Each selected assembly will be registered individually and will become referenceable in scripts. You use this for other .Net assemblies
  • Additional Files: Allows you to add additional resource files that are needed by the assembly. They will be registered together with the assembly and automatically loaded when the assembly gets referenced. You use this for config files, native assemblies, other language runtimes and their resources etc.

We will make use of both of these options in the examples below. The recent blog post on image processing is another example showing the use of a predefined assembly that can use these options for registration.

Now you can refer to the registered assemblies from any U-SQL script that has permissions to the registered assemblies’ database (see the code in the U-SQL script in Figure 4). You will have to add a reference for every separately registered assembly. The additional resource files will automatically be deployed. Note that that script should not have a code-behind file for the code in referenced assemblies anymore, but can still provide other code.


How do I register assemblies via ADL Tools in Visual Studio and in U-SQL scripts?

While the ADL Tools in VisualStudio make it easy to register an assembly, you can also do it with a script (in the same way that the tools do it for you) if you are for example developing on a different platform, have already compiled assemblies that you just want to upload and register. You basically follow the following steps:

  1. You upload your assembly dll and all additionally required non-system dlls and resource files into a location of your choosing in your Azure Data Lake Storage account or even a Windows Azure Blob Store account that is linked to your Azure Data Lake account. You can use any of the many upload tools available to you (e.g., Powershell commands, VisualStudio’s ADL Tool Data Lake Explorer upload, your favorite SDK’s upload command or through the Azure Portal).
  2. Once you have uploaded the dlls, you use the CREATE ASSEMBLY statements to register them.

We will use this approach in the spatial example below.


How do I register assemblies that use other .Net assemblies (based on the JSON and XML sample library)?

Our U-SQL Github site offers a set of shared example assemblies for you to use. One of the assembly, called Microsoft.Analytics.Samples.Formats provides extractors, functions and outputters to handle both JSON and XML documents. The Microsoft.Analytics.Samples.Formats assembly depends on two existing domain-specific assemblies to do the processing of JSON and XML respectively. It uses the Newtonsoft Json.Net library for processing the JSON documents, and it uses the System.Xml assembly for processing XML. Let us use it to show how to register them and use the assemblies in our scripts.

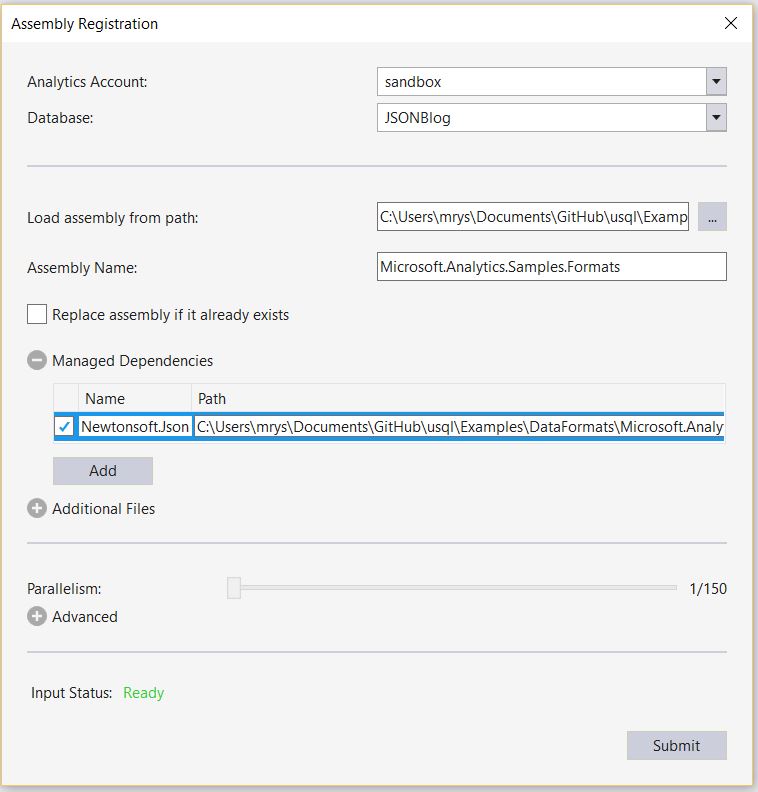
First we download the VisualStudio project to our local development environment (e.g., with making a local copy with the GitHub tool for Windows). Then we open the solution in VisualStudio, right click on the project as explained above to register the assembly. While this assembly has two dependencies, we only have to include the Newtonsoft dependency since System.Xml is available in the Azure Data Lake already (it will have to be explicitly referenced though). Figure 6 shows how we name the assembly (note that you can chose a different name without dots as well), and add the Newtonsoft dll as well. Each of the two assemblies will now be individually registered in the specified database (e.g., JSONBlog).

Register the Microsoft.Analytics.Samples.Formats assembly
Figure 6: How to register the Microsoft.Analytics.Samples.Formats assembly from VisualStudio

If you or others, who you shared the registered assemblies with by giving them read access to the database, now want to use the JSON capability in your own scripts, you just add the following two references to your script:

REFERENCE ASSEMBLY JSONBlog.[NewtonSoft.Json];
REFERENCE ASSEMBLY JSONBlog.[Microsoft.Analytics.Samples.Formats];

And if you want to use the XML functionality, you add a system assembly reference and an assembly to the registered assembly:

REFERENCE SYSTEM ASSEMBLY [System.Xml];
REFERENCE ASSEMBLY JSONBlog.[Microsoft.Analytics.Samples.Formats];

For more details on how to use the JSON functionality, see this blog post.


How do I register assemblies that use native C++ assemblies (using the SQL Server 2016 Spatial Type assembly from the feature pack)?

Now let’s look at a slightly different scenario: Let’s assume my assembly that I want to use has a dependency on code that is not .Net based, in particular, the assembly has a dependency on a native C++ assembly. An example of such an assembly is the SQL Server type assembly Microsoft.SqlServer.Types.dll that provides .Net based implementations of the SQL Server hierarchyID, geometry, and geography types to be used by SQL Server client-side applications for handling the SQL Server types (it was also originally the assembly providing the implementation for the SQL Server spatial types before the SQL Server 2016 release).

Let’s take a look at how to register this assembly in U-SQL!

First, we download and install the assembly from the SQL Server 2016 feature pack. Please select the 64-bit version of the installer (ENUx64SQLSysClrTypes.msi), since we want to make sure that we have the 64-bit version of the libraries.

The installer installs the managed assembly Microsoft.SqlServer.Types.dll into C:Program Files (x86)Microsoft SQL Server130SDKAssemblies and the native assembly SqlServerSpatial130.dll into WindowsSystem32. Now we upload the assemblies into our Azure Data Lake Store (e.g., into a folder called /upload/asm/spatial). Since the installer has installed the native library into the system folder c:WindowsSystem32, we have to make sure that we either copy SqlServerSpatial130.dll out from that folder before uploading it, or make sure that the tool we use does not perform the File System Redirection of system folders. For example, if you want to upload it with the current VisualStudio ADL File Explorer, you will have to copy the file into another directory first, otherwise – as of the time of the writing of this blog – you will get the 32-bit version uploaded (since VisualStudio is a 32-bit application which does File System Redirection in its ADL upload file selection window) and when you run a U-SQL script that calls into the native assembly, you will get the following (inner) error at runtime:

Inner exception from user expression: An attempt was made to load a program with an incorrect format. (Exception from HRESULT: 0x8007000B)

After uploading the two assembly files, we now register them in a database SQLSpatial with the following script:

DECLARE @ASSEMBLY_PATH string = "/upload/asm/spatial/";
DECLARE @SPATIAL_ASM string = @ASSEMBLY_PATH+"Microsoft.SqlServer.Types.dll";
DECLARE @SPATIAL_NATIVEDLL string = @ASSEMBLY_PATH+"SqlServerSpatial130.dll";

CREATE DATABASE IF NOT EXISTS SQLSpatial;
USE DATABASE SQLSpatial;

DROP ASSEMBLY IF EXISTS SqlSpatial;
CREATE ASSEMBLY SqlSpatial
FROM @SPATIAL_ASM
WITH ADDITIONAL_FILES =
     (
         @SPATIAL_NATIVEDLL
     );

Note that in this case, we only register one U-SQL assembly and include the native assembly as a string dependency to the U-SQL assembly. In order to use the spatial assemblies we only need to reference the U-SQL assembly, and the additional file will automatically be made available for the assembly. Here is a simple sample script using the spatial assembly:

REFERENCE SYSTEM ASSEMBLY [System.Xml];
REFERENCE ASSEMBLY SQLSpatial.SqlSpatial;

USING Geometry = Microsoft.SqlServer.Types.SqlGeometry;
USING Geography = Microsoft.SqlServer.Types.SqlGeography;
USING SqlChars = System.Data.SqlTypes.SqlChars;

@spatial =
    SELECT * FROM (VALUES 
                   // The following expression is not using the native DDL
                   ( Geometry.Point(1.0,1.0,0).ToString()),    
                   // The following expression is using the native DDL
                   ( Geometry.STGeomFromText(new SqlChars("LINESTRING (100 100, 20 180, 180 180)"), 0).ToString()) 
                  ) AS T(geom);

OUTPUT @spatial
TO "/output/spatial.csv"
USING Outputters.Csv();

The SQL Types library has a dependency on the System.XML assembly, so we need to reference it. Also, some of the methods are using the System.Data.SqlTypes types instead of the built-in C# types. Since System.Data is already included by default, I just can reference to the needed SQL type. The code above is available on our Github site.


Some comments on Assembly versioning and other interesting tidbits

Let me add some additional interesting information about U-SQL assemblies.

Currently, U-SQL uses the .Net Framework version 4.5. So please make sure that your own assemblies are compatible with that version of the runtime!

As mentioned above, U-SQL runs code in a 64-bit (x64) format. So please make sure that your code is compiled to run on x64. Otherwise you will get the incorrect format error shown above!

Each uploaded assembly dll, resource file such as a different runtime, a native assembly, or config files etc can be at most 400MB and the total size of deployed resources either via the DEPLOY RESOURCE or via references assemblies and their additional files cannot exceed 3GB.

Finally, please note that each U-SQL database can only contain one version of any given assembly. For example, if you need both the version 7 and version 8 of the NewtonSoft Json.Net library, you will need to register them into two different databases. Furthermore, each script can only refer to one version of a given assembly dll. In this respect, U-SQL follows the C# assembly management and versioning semantics!

MSDN Blogs: test post 2


MSDN Blogs: testblogpost wzbdeyfhkg-Updated

MSDN Blogs: Using dynamic query values (SysQueryRangeUtil) in Dynamics AX

$
0
0

Whenever I setup Cues for customers in AX 2012 I use dynamic filtering to create actionable cues representing relevant data. I do tend to forget the precise name of the methods and number of parenthesis etc. so here is the full list of end-user available methods based on the SysQueryRangeUtil class:


Most used:

NameUsed howExample
dayRange(dayRange(-1,2)) gives a query result of all records from yesterday until the day after tomorrow.

Note that it is unfortunately not possible to use decimals, only full days work.

image001
day(day(-1)) gives all records of yesterday, (day(1)) gives records of tomorrow.

Remember that options such as <(day(-1)) works for identifying for example any date before yesterday

image003
monthRange(monthRange(-1,0)) last month and this monthimage005
yearRange(yearRange(-1,0)) last year and this yearimage007
lessThanDate

lessThanUtcDate

lessThanUtcNow

(lessThanDate(-1)) (calculated from the AX session date)

(lessThanUtcDate(-1)

The date represented on the AOS

(lessthanUtcNow())

Calculates from “Now”

image009
greaterThanDate

GreaterThanUtcDate

greaterThanUtcNow

greaterThanDate(5)) (calculated from the AX session date)

(greaterThanUtcDate(-1)

The date represented on the AOS)

(greaterthanUtcNow())

Calculates from “Now”

image011
currentUserId(currentuserid())

Take the user id and filter on for example “created by”

Good for making a generic query relevant for the individual users, forexample a Cue along the lines of “Sales orders I have created”

image013
currentWorker(currentWorker())


A somewhat advanced option but nice for filtering on records where you have assigned for example a sales responsible.

Note that the value returned is a record ID

For example for a cue along the lines of “Sales orders I am responsible for”

image015
currentParty(currentparty())


Similar to the currentWorker but could potentially be used if the user was something other than a Worker.

Note the returned value is a record id.

image017
currentCompany(currentcompany())

For filtering on “system” tables such as the worker table

image019


Remember also the ability to compare two fields on the same table using the AOT names within a set of parenthesis. The system names can be found on the personalization screen. Just recently I have used it forexample in the below example to compare reequested ship date and confirmed ship date on a sales order (back) lines.

image021

MSDN Blogs: testblogpost mzphhbpasggiddysisjspkdysexkhp

MSDN Blogs: SQL Server instance not starting–failing with ex_handle_except encountered exception C06D007F

$
0
0

Couple of days ago I was on one of my regular customer engagements and as always, there was some proper fun with SQL Server that I had to get my hands dirty with.

So the situation is the following: a highly consolidated environment of SQL Server 2012, 1014 and 2016 standalone instances with Always On Availability Groups, syncing to a secondary site. So far so good. Everything was in production, working without any issues until one day, there was a requirement to install another pair of instances for a new application. The requirement was for a SQL Server 2012 with latest SP (in our case – SQL Server 2012 SP3). The customer starts with the installation of RTM and everything goes well. He then proceeds with applying SP3 and all of a sudden – the patch process hangs and ultimately fails, leaving the instance in an inconsistent state. The fun thing was, that this entire installation and patching went perfectly fine on the second machine.

During our investigation, we noticed the following symptoms:

  • During the patch, the SQL Server instance was not able to start and the Windows log was filled with exceptions like below

clip_image001

  • The SQL Server error log contained the following error

clip_image002

So as it seems, due to the patching process, there was something preventing the instance from starting up. And that something was causing a stack dump. So…I basically had three options:

  • Open a case to Microsoft Support so they can analyze the stack dump
  • Try to analyze the dump myself (that is fun, but also time consuming and not something that is fun while onsite with a customer)
  • Scan whatever knowledge base/internet article I can find

I tried to start with the third option first. Naturally I found number of articles with the exception code, pointing to a stack dump generation and here and there some third party tools, messing the SQL Server memory stack. My customer had only antivirus there, so naturally I went for stopping it immediately, but that did not help.

One of the many good things when you work for Microsoft is, that you get to access our internal database with all the customer support cases, so that was my next attempt. Besides all the cases with some third-party tools, preventing the startup, I noticed couple of situations, where the SqlServerSpatial110.dll causing some issues due to wrong versions. WRONG VERSIONS?!?

Yep, I immediately went for checking this DLL. As it turns, there is one DLL for every SQL server version, installed on the machine, which is stored at C:Windowssystem32 folder:

clip_image003

As it turned out, the SqlServerSpatial110.dll for some reason was the version, coming from SQL Server 2014. Great! So, I found a SQL 2012 SP3 version of that DLL (2011.110.6020.0), replaced it and everything was going well.

I am not sure at this point if this would help anyone else, having the same exception, however I guess if you ever hit it, it is worth trying!

MSDN Blogs: Virtual Machine Scale Sets – It is really about protecting your application’s performance

$
0
0

Azure Virtual Machines Scale Sets serve as the foundation for your auto scaling capabilities. The architecture of virtual machine scale sets greatly simplifies the ability to run a cluster that can adjust either by scaling out or by scaling up.

The Azure Container Service leverages scale sets so it might be useful to better understand how they work.

The real beauty comes in because you can set up thresholds for such things as CPU utilization across the cluster, paving the way For Azure to automatically monitor and respond to thresholds for a variety of performance metrics, not the least of which is percent CPU utilization.

In this post we will demonstrate automatically scaling up when the overall cluster percent CPU utilization stays above 60% more than five minutes.

The purpose of this walk-through is to illustrate the following:

  • How to provision Azure scale sets using the Azure Resource Manager Template mechanism.

  • How to work with the json-formatted template file, the place that we set up our VM types. The operating system. The number of cores. The amount of memory. Load balancer rules, public IP addresses, storage accounts, and more.

  • How to use Azure commandline utilities as well as an Azure resource manager template to provision virtual machines that can leverage Azure scale sets.

  • A deep dive on instance count, storage account, virtual networks, public IP addressing, load balancers, and Azure scale sets, as well as the relationship among these different components.

  • A demonstration of how auto scaling kicks in to provision additional virtual machines in the deployment.

Provisioning Infrastructure in Azure

Before diving into the mechanics of Azure scale sets and how they work, let’s quickly review how infrastructure gets provisioned in Azure. There are a variety of ways that you can provision infrastructure and Azure. We will focus on using the Azure command line utilities.

Notice in the diagram below that there are two json files that represent the infrastructure would like to provision. Using the Azure command line utilities, the infrastructure definition contained in those json files can be transformed into actual compute, storage, and networking infrastructure within a user’s Azure subscription.

scale-sets

Figure 1: Using the cross-platform tooling to deploy infrastructure

Azure Group Create

Notice in the figure below there is a red box around what appears to be a command. This command (“azure”) is the Azure command line tool. It accepts a number of parameters.

Here are some things to realize about the command you see there:

$ azure group create "vmss-rg""West US" -f azuredeploy.json -d "vmss-deploy" -e azuredeploy.parameters.json
  • azure group create
    • Is the fundamental command that builds out your infrastructure
  • vmss-rg
    • Is the name of your resource group, which is a conceptual container for all the infrastructure you deploy (VMs, Storage, Networking). If you delete a resource group, you delete all the resources inside of it
  • WestUS
    • Is a data center where your deployment will take place
  • vmss-deploy
    • Is the name of the deployment (so you can refer back to it later)
  • azuredeploy.json
    • Is where you define the infrastructure you want to deploy
  • azuredeploy.parameters.json
    • Allows you to specify which values you can input when deploying the resources. These parameter values enable you to customize the deployment by providing values that are tailored for a particular scenario, like the number of VMs you want in your scale set

The Azure Cross Platform tooling can be downloaded here:

https://azure.microsoft.com/en-us/documentation/articles/xplat-cli-install/

My final point for the diagram below is that the most important section is the Resources section.

image0001

Figure 2: Understanding how the Azure group create command works

Choosing a data center

Azure’s global footprint is always increasing. While we might’ve chosen the west US for our destination, there are many other options.

datacenters

Figure 3: Choosing a data center

Building a template so you can provision VMs in a VM Scale Set

The discussion above assumes that you already had define your json-formatted templates. So what we want to do now in this next section is actually walk through one of these templates. Luckily for us, there are some samples we can work from..

The repository on github contains many templates.

https://github.com/Azure/azure-quickstart-templates

image0004

Figure 4: Downloading sample ARM templates

git clone https://github.com/Azure/azure-quickstart-templates.git

A simple clone command will download the templates locally.

image0007

Figure 5: Cloning the QuickStart templates locally

We are interested in 201-vmss-ubuntu-autoscale. This example demonstrates some of the core features.

image0010

Figure 6: Viewing the auto scale set example

Viewing the Sample Template

So we will start exploring azuredeploy.json. In the first section, the parameter section, which was explained earlier, allows us to pass values to customize a deployment.

We may want to pass in different numbers of VMs per Scale Set.

In the figure below you will note that the first parameter is vmSku, and that simply represent the type of hardware we want to use. We are choosing Standard_A1, because that’s a simple single core VM.

See this link: https://azure.microsoft.com/en-us/documentation/articles/virtual-machines-windows-sizes/

  • A-series
  • A-series – compute-intensive instances
  • D-series
  • Dv2-series
  • DS-series*
  • DSv2-series*
  • F-series
  • Fs-series*
  • G-series
  • GS-series

image0013

Figure 7: Choosing the VM size

This next section simply indicates the operating system type (Ubuntu in this case).

image0016

Figure 8: Indicating the operating system

vmSSName represents the name that we will get to the VM scale set. This is the higher level of abstraction above naming individual VMs.

image0019

Figure 9: Naming the scale set

Resources Section

We are going to skip over the variables section for now. instead, we will focus on the resources section, which is where we define the actual infrastructure we want to deploy it:

  • The VM scale set itself
  • Storage
  • Networking
  • Load balancers
  • and more

virtualNetworks

The VMs inside of the scale set will need to have a networking address space.

Learn more here: https://azure.microsoft.com/en-us/documentation/articles/resource-groups-networking/

image0022

Figure 10: Specifying network information

Storage accounts are needed because the underlying disk image that is hosting the operating system will need to be tied to a storage account. You will see this referenced later by the VM scale set itself.

image0025

Figure 11: Defining the storage accounts

Public IP addresses are necessary because they provide the load balanced entry point for the virtual machines in the scale set. The public IP address will route traffic to the appropriate virtual machines in the scale set.

image0028

Figure 12: Public IP Address

This is where you define the metrics that determine when you’re scale set will scale up or scale down. There are a variety of metrics that you can use to do this. In the next section, rules defines which metrics will be used for scaling up scaling down.

image0037

Figure 13: Autoscale Settings

Here between lines 311 and 320 you can see that the percent processor time is being used to scale up or scale down. Most of the time window indicates for five minutes if more than 60% of the processor capability is used, a scale up of that will be triggered. On lines 323 two 326, you can notice that we will scale up one VM if the percent processor time threshold is reached. An on line 322 through 326, you will note that we scale up for just one VM

image0040

Figure 14: Percent processor time as a scaling metric

We also need to define how we scale back down. Notice that if the percent processor time dips below 30% for five minutes or more, we will scale down.

image0043

Figure 15: Scaling the cluster down

Load balancing is used to route traffic from the public Internet to the load balanced set of virtual machines.

If you look closely on lines 181 and 182, you will notice that we define a front-end port range through which we can map to specific VMs. You will need to refer back to the resource file to really understand which specific numbers are being used. I have included an excerpt below.

So what this means is that if you SSH into port 50,000, you will reach the first VM in the scale set. If you SSH into 50,001, you will reach the second VM scale set. And so on.

"natStartPort": 50000,
"natEndPort": 50119,
"natBackendPort": 22,

Consecutive ports on the load balancer map to consecutive VMs in the scale set.

loadbalancer

Figure 16: Understanding the load balancer and the routing into scale sets

Finally, we get to the core section where we specify that we want to use the VM scale sets.

On line 194 you will notice that there is a dependency on the underlying storage accounts, because the underlying VHD file for each of the VMs needs a storage account.

If you read the detailed sections of this particular resource, you will note that it leverages some of the previously defined resources, such as the operating system, the networking profile, the load balancer, etc.

Finally, towards the end, as you can see in the json below, we are defining some diagnostic resources so we can track the performance of our virtual machine scale sets.

"extensionProfile": {
"extensions": [
  {
    "name": "LinuxDiagnostic",
    "properties": {
      "publisher": "Microsoft.OSTCExtensions",
      "type": "LinuxDiagnostic",
      "typeHandlerVersion": "2.3",
      "autoUpgradeMinorVersion": true,
      "settings": {
        "xmlCfg": "[base64(concat(variables('wadcfgxstart'),variables('wadmetricsresourceid'),variables('wadcfgxend')))]",
        "storageAccount": "[variables('diagnosticsStorageAccountName')]"
      },
      "protectedSettings": {
        "storageAccountName": "[variables('diagnosticsStorageAccountName')]",
        "storageAccountKey": "[listkeys(variables('accountid'), variables('storageApiVersion')).key1]",
        "storageAccountEndPoint": "https://core.windows.net"
      }
    }
  }
]
}

scalesetsresource

Figure 17: Defining the virtual machine scale sets

Overprovisioning

  • Starting with the 2016-03-30 API version, VM Scale Sets will default to “overprovisioning” VMs.
  • This means that the scale set will actually spin up more VMs than you asked for, then delete unnecessary VMs.
  • This improves provisioning success rates because if even one VM does not provision successfully, the entire deployment is considered “Failed” by Azure Resource Manager.
  • While this does improve provisioning success rates, it can cause confusing behavior for an application that is not designed to handle VMs disappearing unannounced.

overprovision

Figure 18: The overprovision property

Using the command line to provision our virtual machine scale set

Before diving into the command line. Let’s finish off working with the azuredeploy.parameters.json file, which is where we customize or parameterize the deployment.

This is the file that is used to pass in parameters, such as the:

  • vmSku
  • ubuntuOSVersion
  • vmssName
  • instanceCount (how many VMs to include in the scale set initially)
  • etc

image0046

Figure 19: Customizing the deployment

Now we are ready to issue the command to provision that virtual machine scale sets using the Azure cross-platform tooling.

azure group create "vmss-rg""West US" -f azuredeploy.json -d "vmss-deploy" -e azuredeploy.parameters.json

Note below that we are executing the azure group create command. It passed the preflight validation because we don’t see any failure yet.

image0049

Figure 20: Executing the deployment

Notice the things that we walk through previously within the template have now been made reality:

  • Virtual machine scale set
  • Load balancer
  • Public IP address
  • Various storage accounts

image0052

Figure 21: The infrastructure that was deployed

If we drill down to the details of the scale set, you will notice that currently it plumbs to the instance count *that was passed in. As you recall, the *instance count was 3 in the parameters file.

image0055

Figure 22: Details of the VM scale set

Verifying that auto scaling is functioning

What we want to do now is stres the system and force CPU utilization to rise above 60% for more than five minutes, so that we can see the scaling up of our VMs.

Stress

There is a utility called stress that makes this easy.

So we will use the command below to remote and so that we can install this utility.

Because we will need to stress the tool on each individual VM, we will remote into each of our three VMs that are in the scale set.

Which ports work can be determined from listing the VMs or querying the LB NAT rules. On my second deployment note that 50004 ended up being the port to remote into.

nat-rules

Figure 23: Looking at NAT rules to determine available ports

Once remote did in the next step is to go in and run the stress tool. Remember when you talk about percent CPU utilization you are talking about the average of all the nodes in your cluster, not anyone machine. This makes sense, of course.

image0079

Figure 24: Remoting in and using the appropriate number

Well, it turns out that stress is not available by default in Ubuntu.

So let’s install the stress utility.

###Stressing the VMs in the scale set

  • Step 1 – SSH into each of the three VMs and the scale set
  • Step 2 – Install stress
  • Step 3 – Run stress
  • Step 4 – Run top

This next section will discuss or explain the upcoming images that follow this narrative.

Step 1 of 4 – SSH into each of the three VMs and the scale set

We will need to be logged into each of the VMs and the scale set so that we could install stress and run it.

Step 2 of 4 – Install stress

Stress is the utility that will max out your CPU so that you can trigger a scale event.

sudo apt-get install stress

Step 3 of 4 – Run stress

We will run it as follows with the following parameters:

stress --cpu 8 --io 4 -c 12 --vm 2 --vm-bytes 128M --timeout 800s &

Step 4 of 4 – Run top

Top gives us a nice depiction of CPU utilization so we can verify that it is high enough to trigger a scale event.

top

image0082

Figure 25: We are SSH’d into each of the VMs and the scale set

image0085

Figure 26: Installing Stress (sounds funny)

image0088

Figure 27: Remember to install it on all of the VMs and the scale set

image0091

Figure 28: Verifying %CPU Utilization

Some key points.

  • Scale out is based on average CPU across the scale set.
  • You can scale up too (More CPU, Memory, Storage).
  • The whole cycle can take 20 minutes for all the magic to happen (VMs provisioned, de-provisioned, etc).
  • Insights pipeline needs to be initiated (e.g. create storage account, start sending data, initialize Insights engine etc.).
  • After the first scale event, you can expect scale events to take 5-10 minutes depending on timing (5 minute sampling plus time to start VM etc).

image0094

Figure 29: Make sure you wait

Success – VMs in scale set provisioned

This is actually exactly what we were looking for. Notice that two additional VMs got brought online to accommodate and compensate for the massive spike in CPU utilization. If you think about it, three virtual machines running at 80% utilization need to be at 40% minimum, given the sudden and massive spike. So the question becomes what number of additional VMs are needed to bring down the CPU to a reasonable level. I like that Azure brought 2 VMs online, not just one. Feels like a safer but prudent reaction to CPU spikes.
`
I will conclude this post right here but there is more to talk about. I encourage everybody to go simply do some searching around the web for guidance around Azure scale sets.

image0100

Figure 30: the moment we have been waiting for

Conclusion

This brief walk-through has taken you from beginning to end, allowing you to see how a scale set is constructed, how to set up some metrics to trigger scale up and scale-down events. This post took you through a detailed walk-through all the way to the point of validating that scale sets work and that additional VMs can be brought online in the event of high CPU utilization across the cluster.

MSDN Blogs: End-to-end WordCloud using Rust, TypeScript, AngularJS 2, and timdream’s WordCloud

$
0
0

Word clouds are a very attractive way of visually representing the relative importance of words. At a glance you can guess how important a word is relative to the others in the cloud. We will build two components:

  1. A text parser that will calculate the relative weight of each word in a given text (we’ll use some classical texts as source). The text parser will also expose a JSON REST interface.
  2. An AngularJS app that will get the JSON data and then pass it to timdream’s WordCloud component in a suitable manner.

The final result is like this:

00

You can find the complete source code here: https://github.com/MindFlavor/word_count_rust_angular2. Due to the nature of this blog we will discuss here the data management parts only. Our logic is pretty simple: count each occurrence of a word and use it to determine how big the word will appear in the cloud.

AngularJs 2 App

There are many open source JavaScript libraries that render word clouds, for this post we’ll use timdream’s one: http://timdream.org/wordcloud/. Timdream’s library comes complete with Typings which is helpful working with TypeScript. This time I will skip the steps required to startup a TypeScript project in Visual Studio Code. If you need more help please refer to my previous post: How to render SQL Server acyclic blocking graphs using Visual Studio Code, TypeScript, NodeJS and TreantJS – Part 1.

Service

We will start with the service. The service is responsible to retrieve the data (an HTTP GET) and to map it to the strongly typed class. The class for our word weight is a two-liner:

The service itself is:

Notice the @Injectable attribute. It’s required so Angular knows that our service can be injected in our component. We are also requesting an instance of the Http class in the constructor (via dependency injection). We can then use Http member to get the JSON from our service.

Using Promises, along with the TypeScript’s arrow operator, makes the code simple and easy to follow.

Component

The Angular component requests the service as prerequisite. It does it in the class decorator under the name providers:

And requests its injection in the constructor:
The WordCloud code is in the setText method. Here, again, we exploit the Promise in order to get rid of the async HTTP call:
That’s it for our presentation layer. If we want to try it we can create a mock service returning static values. For example:

Now just inject the mock service instead of the real one and test the app.

WordCount service

The WordCount service should simply count the occurrences of every word in a given file. This is basically the textbook example of map/reduce. To spice the things up a bit we also want to:

  1. Exclude noise words (based on a dictionary).
  2. Consolidate similar words (singular/plural, synonyms, etc…).

We also want to create a multithreaded word count service. If we are CPU-bound this should help to speed up the computation on multithreaded machines. This kind of programs are – this example excluded – hard to code. Fortunately there are new languages built from the ground up to tackle the concurrency problems. One I particularly like is Rust (https://www.rust-lang.org). While targeted to systems programming Rust can be successfully used for other tasks too. In our case it forces us to think about ownership of shared resources, which is good for multithreaded applications (you can find more about it in this blog post https://blog.rust-lang.org/2015/04/10/Fearless-Concurrency.html).

Let’s recap the serial logic:

  1. Load a file. For each word:
    1. Check if is a noise word.
    2. Lookup the most relevant synonym (if any). If found use it instead of the original word.
    3. Increase the word’s count by one.
  2. Present the total per word ordered by occurrence count.

If we were able to apply the serial logic in parallel we could come up with:

  1. Load the file. For each word:
    1. Find an available thread and dispatch the word to it.
  2. Each thread will, for each word received:
    1. Check if it is a noise word.
    2. Lookup the most relevant synonym (if any). If found use it instead of the original word.
    3. Increase the word’s count by one.
  3. When all the words are dispatched and processed, present the total per word ordered by occurrences.

The data race

The parallel algorithm is good in theory but poses some immediate questions: “How do I dispatch a word to a thread?” or “How can a thread know when there are no more words to process?”.

The biggest problem, however, lies in the data race between threads. The step Increase the word’s count by one will be performed by multiple threads in parallel and, unless we mediate the access to the counter somehow, problems will arise. This is nasty because, in most languages, your code will compile and run even if you were modifying the same object from multiple threads. The result can be a segfault if you’re lucky or, way worse, miscalculations.

Bottom line you’re own your own. If you are a superstar coder you will prevent problems and end up with an efficient concurrent algorithm. But if you’re a normal person like me, chances are you will end up scratching your head at the pseudo random errors.

The good news is, with Rust, you cannot forget about such things. Rust will force you to prevent data races or your code won’t even compile.

Even the apparent innocuous concurrent access to a shared vector should be safe. With Rust it must be safe (thankfully). Let’s see how.

Concurrent access to a shared resource

Let’s try to share an immutable vector across threads. A first approach could be:

Here we declare a vector (v) and then we spawn 3 threads that will print the vector contents concurrently. Seems legitimate? Well, it isn’t. Rust will tell us why:

Rust tell us that the thread may outlive work (the spawning function). But if the spawning function (work) terminates, what happens to the vector v? Since the ownership of v belongs to work and not the threads, as soon as work finishes the vector would be deallocated. And the threads would end up keeping a reference to dellocated memory. Bad.

Transferring ownership

Rust’s new error system will suggest you to move (transfer) the ownership of the vector to the thread. It makes sense: if work relinquishes the ownership of v to the thread it will no longer deallocate v. v would get deallocated at the end of the thread (as it should).

Let’s try it (notice the move keyword before the closure):

Will this work? No. Rust error is like this one:

The error this time is harder to interpret. The hint is in the note: v does not implement `Copy` trait. Why Rust tries to copy our vector instead of simply transferring ownership? Because we are transferring the ownership of one vector to three threads. Since it’s impossible Rust tries to send three separate copies of our vector to our three threads. But since by default our structures cannot be copied it doesn’t work (luckily because it’s not something we wanted to do in the first place).

Go on and try to remove the for loop and spawn a single thread instead of three. In that case the move will work.

Reference-counted pointers

Clearly moving the ownership of the vector to our threads cannot work without copying it for each thread. This solution is a waste of memory since we know our vector to be immutable. We should be able to access it concurrently without mutexes of any kind. But without copies we cannot move the vector and without move the thread will outlast the vector.

So, how do we solve the lifespan problem?

One answer is to use reference counted pointers. These wrappers will keep count of how many references are present at any time and only deallocate the inner object when nobody else is referencing it. It’s roughly what a GC-based language would do. Only here we get deterministic deallocation (and also the circular reference problem).

In our case it means the inner object will be referenced by the work function and by each thread. So there are 4 references (1 for work + 1 for each thread). When work terminates the reference count will simply drop to 3. And the vector won’t be deallocated (yet).

You can read more about it here: https://doc.rust-lang.org/std/sync/struct.Arc.html and here https://doc.rust-lang.org/book/concurrency.html.

That’s our final, working, code:

If you try to call it chances are your program will terminate even before the threads have got a chance to print the vector. You could join the threads or, better, coordinate the execution via channels.

Channels

Channels are an elegant way to send messages between threads. Rust’s channels are special: they are also able to transfer ownership of entities between threads. Let’s see how with an example.

We have this super dumb function that returns a Vector:

If we were to run it in a separate thread we could call the join method of the thread and retrieve the result:
It works (unwrap notwithstanding) but if we wanted to return data from the thread as soon as it’s created? The answer is simple: open a channel between threads.
In this example we are sending unsigned longs but we could send anything. In our WordCount service we will be sending in lines to be processed and we will receive back the partial word count. In other words, we will stream lines into the thread to be processed as fast as possibile. When there are no more rows to process we will close the channel. This way the processing thread will know that there is no more data and should produce the results. The results are sent back via another channel which in fact moves the ownership back to the main thread. At this point the processing thread can terminate.

Putting all together

Now that we are able to share safely an immutable structure between threads and to send ownership using channels we can implement our concurrent word counter method:

Now all we have to do is to expose this method through a REST interface. For this I’ve used Iron framework. I will not show the code here since it’s very simple.

This example of parallel map => parallel reduce => serial reduce is surprisingly fast and, last but not least, cross platform.

I’m sure better performance can be achieved further optimizing the code but I’ll leave it up to you :).


Happy coding,

Francesco Cogno

MSDN Blogs: Looking for Power BI Training? Check out Dashboard in a day in Chicago

$
0
0

If you are a Power BI customer in the Chicago area looking for Power BI training, join Rightpoint for some of the best Power BI training available, an end to end look at Power BI with the Dashboard in a Day (DIAD) training jointly developed with Microsoft.

Chicago Dashboard in a Day

DIAD Chicago

DIAD is designed to accelerate your Power BI experience with a comprehensive training program in a single day. All you have to do is bring your Windows-based Notebook and we’ll supply the rest – even Lunch!
With DIAD you get practical hands-on experience. During this training session attendees will learn:

  • How to connect to, import & transform data from a variety of sources
  • Build real data models, as well as author and publish Business Intelligence reports
  • Customize and share your “creations” for collaboration with other groups securely inside your organization including mobile device sharing

Image result for register button

Register now to start learning about building great Dashboards.

When:

Wed, Sep 21 2016| 8:00AM – 5:00PM CST

Where:

Chicago MTC

200 East Randolph Drive, Suite 200
Chicago, IL 60601


image

About the Presenter:

Neal Levin

SOLUTION SPECIALIST, ENTERPRISE

Neal is responsible for helping our clients create a vision for the “Connected Company.”

Neal takes the time to understand specific client needs and translates those needs to specific solutions for enterprise collaboration and insight.

Neal has extensive experience in enterprise collaboration and business intelligence. Before joining Rightpoint, Neal spent seven years at Microsoft Corporation in a variety of Pre-Sales technical roles. Prior to joining Microsoft, Neal was enterprise solutions consultant with KPMG Consulting/BearingPoint, focused on CRM and ERP solutions.


About Righpoint

Rightpoint’s business philosophy is to rethink the “typical” consulting model by combining attributes of management consulting, IT consulting and creative agency services to help clients drive business results by solving strategic problems. Rightpoint’s pervasive “intrapreneurial” spirit, which ensures that clients “get it right” the first time, is the foundation by which we have built a strong, national reputation for excellence.


MSDN Blogs: Free Dashboard in an Hour Power BI Training Sept 21st

$
0
0

Neal Analytics, PowerPivotPro and the Seattle User Group are teaming up to offer free Power BI Training Sept 21st.

Dashboard in an Hour

 image

DIAH is designed to accelerate your Power BI experience with a comprehensive training program all in a single hour. All you have to do is bring your Windows-based Notebook and we’ll supply the rest – even some snacks!
With DIAH you get practical hands-on experience. During this training session attendees will learn:

1. Get Data/Modeling by Avi Singh

2.  Visualizing by Charles Sterling

3.  Collaborating and Sharing your data by David Brown


Image result for register button

Register now to start learning about building great Dashboards.

When: Wed, Sep 21 2016| 7:00PM – 8:00PM PST

Where: Microsoft Building 35

3940 159th Ave NE, Redmond, WA 98052, Redmond, WA (map)

About the Presenters:

Avi Singh is a Power BI trainer and consultant based out of Seattle. He is a Microsoft MVP, co-author of the top-selling book “Power Pivot and Power BI: An Excel User’s Guide” and a regular speaker at conferences and user events.

Avi has personally experienced the transformation and empowerment that Power BI can bring, going from an Excel user to building large-scale Power BI solutions. His mission now is to share his knowledge about Power BI.

You can follow him on his blog at www.powerpivotpro.com/author/avichal/ or video blog at https://www.youtube.com/powerpivotpro.

Dylan Dias


https://www.linkedin.com/in/browndavebrown

Through his experience with start-ups and with building solutions for Microsoft Consulting Services, David Brown brings expertise in architecting and planning Business Intelligence, predictive analytics, and data warehousing solutions. As Power BI MVP David works in the Managed Partner reporting space with both Microsoft Enterprise and Midmarket teams, creating tools to maximize Microsoft and Partner revenue. After gaining extensive experience with Business Intelligence there, David moved to Microsoft Consulting Services where he worked with the Premier Mission Critical offerings team designing Microsoft’s highest level of support solutions. David’s background with Microsoft and his start-up mentality allow him to present the highest quality solutions utilizing Microsoft products and partnerships.

See more at: http://www.nealanalytics.com/our-team/

Neal Analytics

About Neal Analytics

Neal Analytics is Microsoft’s premier Azure Machine Learning partner, and a data consulting firm with a management consulting approach. We were founded in 2011 out of The Arnold Group, a prominent Management Consulting Firm in the Seattle area, to resolve the need to back consultative findings with analytics. Our management consulting roots have led to a unique approach towards helping customers extract maximal value from their data. When we begin conversations with our customers, we help them see how they can better extract value from their data. We help customers all across the spectrum, from those in need of their first data warehouse for better data management, to those focused on solving industry-leading predictive analytics problems. Our firm is deeply versed in Microsoft’s Cortana Analytics & IoT technology stacks, and we use these platforms to quickly and effectively solve our customer’s problems. Our deep technical competency has led to an industry-leading position in advanced analytics for Retail, Manufacturing, Consumer Goods, Oil & Gas, Tech, and Education as a Microsoft partner. We engage regularly outside of these core competencies in efforts to help customers revolutionize how they do business with data. If you want to discover how to extract more value from and drive real improvement in your business with data, you should contact Neal Analytics.

See More at: http://www.nealanalytics.com/
https://pinpoint.microsoft.com/en-us/companies/4298307730


PowerPivotPro

About PowerPivotPro

We want to Empower You

It all starts with a single observation: truly impactful analytics are only possible when “the business” is directly involved, in a “hands-on” capacity. The alternative – communicating requirements to IT or consultants, awaiting results, and then iterating – takes too long, costs too much, and delivers too little. If you have ever wondered why Business Intelligence projects seemingly run forever while delivering poor ROI, or why spreadsheets continue to dominate the landscape of reporting and analysis, the answer to both lies in “communication cost” – either paying its enormous cost (in the case of BI projects) or avoiding it (by the Biz taking matters in their own hands, with Excel).

Said another way, your Business cannot merely Consume analytics built by someone else – it must take an active and ongoing role in Producing them. Don’t worry though, only 1-2 people in each department need to wear the Producer hat, and in all probability, they are already wearing it (using Excel to produce reports for the rest of their workgroups). You need only to empower those people with the new “Improved Excel” toolset, one that they will gratefully embrace once they’ve glimpsed its capabilities. And rather than cutting IT out of the equation, this New Way provides the first-ever incentives and foundation for true cooperation between IT and the Biz.

MSDN Blogs: Experiencing Data Access Issue in Azure Portal for Availability Data Type – 08/26 – Resolved

$
0
0
Final Update: Friday, 26 August 2016 21:47 UTC

Between 08/26 9:00 PM UTC and 08/26 9:30 PM UTC, limited number of customers may have experienced errors accessing search due to an issue in one of our back end components. We understand the root cause of the issue as related to a recent configuration changes to this component.

  • Root Cause: The failure was due to changes in the configuration in one of the back end components
  • Lessons Learned: We are investigating additional improvements to internal telemetry to speed diagnosis and tooling to aid in implementation of quicker mitigation of the errors.
  • Incident Timeline: 30 minutes –  08/26 9:00 PM UTC through 08/26 9:30 PM UTC

We understand that customers rely on Application Insights as a critical service and apologize for any impact this incident caused.


-Sapna

MS Access Blog: Grundfos makes global business happen withOffice 365

$
0
0

Today’s post was written by Jens Hartmann, CIO and group vice president at Grundfos Holding.

Jens HartmannAbout eight years ago, Grundfos began its globalization journey. To address the demands of our expanding markets and the increasing numbers of global customers, we opened offices and cost-effective production sites around the world. Today, the Grundfos Group consists of 83 companies in 56 countries, and our annual production of more than 16 million pump units makes us one of the world’s leading pump manufacturers in the world.

That we have reached this point is testament to the talents of our people. At Grundfos, we believe everyone has passion and potential. And it’s the job of IT to provide productivity tools for employees to use to increase their influence and their voice within the company—especially during our global growth phase. That’s why we chose Office 365 to be the foundation of a modern, connected workplace for more than 18,652 employees around the world. We all use Office 365 applications now to connect with each other.

One of our core values is that we say what we do, and we do what we say. Today, we have Yammer at our fingertips to express ourselves in spontaneous ways that drive connections. So, it’s not unusual for someone working on the shop floor to use a mobile phone to join a Yammer conversation started by our CEO and provide feedback about a new company strategy. Our Yammer network is building organically, with many interest groups discussing product design and driving innovation. Engineers reach out through Yammer to the entire organization to ask for suggestions on issues like product development, such as fine-tuning the optimal pressure in a certain kind of pump. And answers come back from all over the world. This means we can solve issues faster, expedite design innovation and provide a better product to the market.

An essential element of a modern, connected workplace is being able to work where and when you need to. With Office 365, Grundfos can function seamlessly as a global workplace. We use business productivity tools, such as Skype Meetings, to maintain collaboration among mobile, dispersed employees. In fact, we have seen a drop in travel costs. We are also using SharePoint Online to support virtual teamwork through collaboration sites that people can access anytime, in any time zone, to manage projects.

Looking back on this journey, I think in IT we are most proud of delivering on our promise to Grundfos that we would provide a new workplace—more connected, more agile, more mobile—which enables a paradigm shift in how our employees can deliver the kind of productivity that we need to compete in today’s marketplace. Today, we are excited about delivering on the promise of Office 365 to accelerate the pace of global business.

—Jans Hartmann

Read the complete business productivity case study for more information about the Grundfos move to Office 365.

The post Grundfos makes global business happen with
Office 365
appeared first on Office Blogs.

MSDN Blogs: The ultimate APC 2016 guide for SMB Partners

$
0
0

APC2

With only a week until the stage is set  – we wanted to share what’s on at APC for any partner that wants to build their SMB business over the next 12 months in partnership with Microsoft.

Here are our topic picks across the 4 days;

Monday:

Tuesday:

Wednesday:

Thursday

If registered you will receive access to MyAPC early next week to start building out your agenda

If you’re not registered, there is still time to grab your tickets last day is Friday 2nd Sept !


MSDN Blogs: Experimentální MySQL v Azure Web Apps

$
0
0

Nová preview funkce MySQL in-app přináší do Azure App Service dlouho žádanou nativní podporu MySQL databáze. Tedy alespoň částečně, pro účely vývoje a testování.

Jak název napovídá, databáze běží ve stejné instanci jako aplikace. Důsledkem je vyníkající výkon, ale také riziko – pokud vypnete webovou aplikaci, nepoběží ani databáze. Z tohoto důvodu je také vhodné aktivovat funkci Always-On, která udrží webový server “vzhůru”, i když na něj nebudou proudit žádné požadavky.

Omezení:

  • Databáze běží ve stejné instanci jako web, z toho plyne, že když se vypne webová aplikace, nepoběží ani databáze.
  • Úložiště je sdílené s webovou aplikací – Free a Shared plány mohou snadno narazit na limity.
  • Nepodporuje škálování na více instancí.
  • Nepodporuje Local cache.
  • Nepodporuje vzdálený přístup přes nástroje pro správu.
  • Databázi nemůžete nasadit přímo, je potřeba ji nejprve exportovat jako SQL skript a ten poté nahrát třeba přes phpMyAdmin.

Pokud jde o funkcionalitu databáze, ta je nedotčena. Určení je tedy jasné: vývoj a testování, primárně PHP a MySQL aplikací v Azure. Jakmile je aplikace připravena pro produkci, je doporučeno přejít třeba na ClearDB.

Jak na to?

V ovládacím panelu Web App, v sekci Settings je nová položka “MySQL In App (preview)“, kde můžete zapnout MySQL přepínačem na hodnotu On.

image

Následně máte dvě možnosti, jak s databází pracovat: phpMyAdmin a KUDU.

Webový phpMyAdmin je automatickou součástí MySQL in-app a není potřeba jej instalovat zvlášť. Jednoduše v sekci MySQL In App klikněte v záhlaví na ikonu Manage:

image

V novém tabu se otevře důvěrně známé administrační rozhraní (na adrese https://[web].scm.azurewebsites.net/phpMyAdmin). Databáze se jmenuje azuredb.

image

Druhá varianta je otevřít KUDU (https://[web].scm.azurewebsites.net) a přejít na Debug console. Tam je v Program Files nainstalovaný nástroj mysql.exe:
cd D:Program Files (x86)mysql5.7.9.0bin
mysql.exe -e "[SQL příkaz]" --user=azure --password=password --port=[port databáze, např. 49667] --bind-address=127.0.0.1
 

Detailní popis s ukázkou použití najdete na oficiálním blogu.

Martin

Viewing all 3015 articles
Browse latest View live